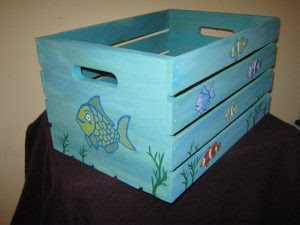
I think it's time to get organizing some of these artist painting supplies. I'm starting to find that I'm accumulating quite the assortment. I want a way to store them that's fun and creative! I have chosen to decorate a wooden crate with some colorful acrylic painted tropical fish in an ocean background. The reason why I chose tropical fish is because they fascinate me with all their pretty colors. They are just about as fascinating and beautiful as birds, flowers and butterflies. In this post I'll be telling you how I made my tropical fish crate. It's really fun and easy!
My Newest Favorite Tool Is Really Cool
To get started I purchased the wooden crate (here's a link to it). My newest favorite tool for painted wooden crates is called a Nicholson Half Round Bastard Cut 12 inch File. Kind of an odd name. They sell flat, round, and half round ones. I like the half round one the best. It's basically a metal file and it's so much easier and economical to use than sandpaper. Just go gently with it at first until you get the feel of it because it is a lot more powerful than sand paper. It will also save you time and money because it's faster and will last so you won't have to replace it all the time like sand paper. You can find it here: Nicholson File, or at your local hardware or department store. Sand the crate so there are no rough edges.
Choose An Interesting Theme For Your Crate
Paint The Background Of Your Whole Crate
I already had the paints on hand. For the ocean you will need different shades of blues, white, green, turquoise and yellow. Don't mix them completely together because you want different shades of colors for the water to give it a little bit of a depth look. Your background can be any color you want. Paint the whole crate in your background color. Let it completely dry.
Decorate It In An Appealing Way Of Your Choice
Use A Sealant To Protect Your Beautiful Project
Once you've decorated your crate and it's completely dry, spray it with clear matte acrylic spray or brush on an outdoor water-based polyurethane sealer. This will protect and preserve your project and give it more durability.
Please leave your comments and questions in the comments section below.
This page contains ad links.


No comments:
Post a Comment